


Ansible is an open-source software provisioning, configuration management, and application-deployment tool enabling infrastructure as code. It runs on many Unix-like systems and can configure both Unix-like systems as well as Microsoft Windows.
Ansible is agentless, temporarily connecting remotely via SSH or Windows Remote Management to do its tasks including its declarative language to describe system configuration.
Let's understand how to set up Ansible.
Pre-requisite:
Redhat Linux
Understanding of Linux
Ansible is written using Python language and by default in RHEL, python is installed, but in your system, if it's not present then install Python at first. Next, run the below-mentioned command and Ansible will be installed on your RHEL system.
pip3 install ansible
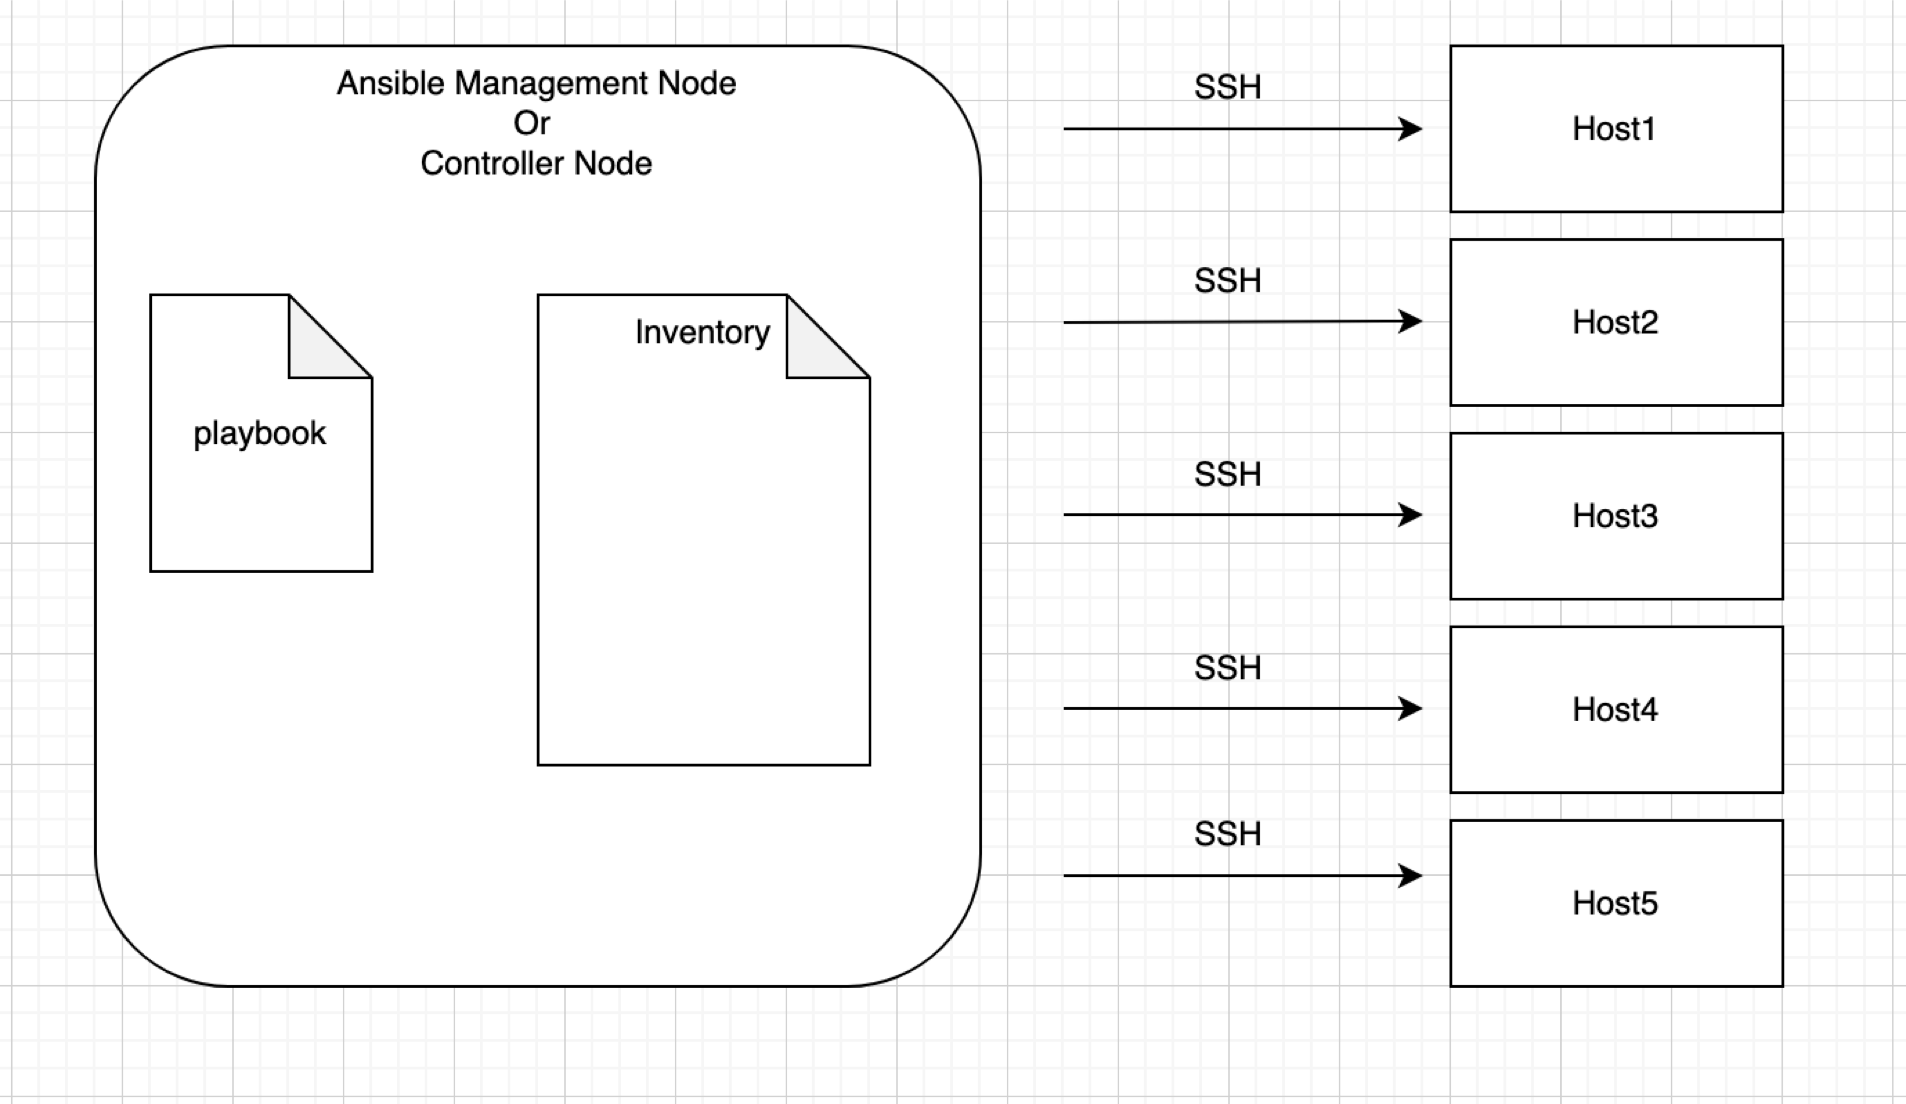
In Ansible, whatever we do, we always use Controller Node. We never go to any Managed Node.
In Ansible rather than using hosts or managed nodes, we use the term “Inventory”
To connect it needs ssh authentication using Ansible Control Machine private/public key pair.
Ansible Controller Node: Server where Ansible is installed.
RemoteNode: Server where we want to ssh from the ansible management node
Set up the configuration file for Ansible and need to mention which is our inventory file.
create one file called “ansible.cfg” inside “/etc/ansible”
cat > /etc/ansible/ansible.cfg
[defaults]
inventory = /etc/ansible/hosts
host_key_checking = False
Ansible Control Machine establishes an SSH connection to the Remote Node with the help of its private/public key. We need three tools to make SSH password-less connection between the Ansible control Machine and Remote Node.
ssh-keygen
ssh-agent
ssh-add
ssh-keygen tool is used to generate private/public key pair for ssh. By default, the tool generates the private (id_rsa) and public (id_rsa.pub) keys in ~/.ssh/ directory. These key pairs are used for password-less login, Single Sign On and hosts authentication.
Key generation: ssh-keygen -t rsa
AnsibleControlMachine:~$ ssh-keygen -t rsa
Generating public/private rsa key pair.
Enter the file in which to save the key (~/.ssh/id rsa):
Enter passphrase (empty for no passphrase): ‹enter passphrase here›
Enter the same passphrase again:
Your identification has been saved in ~/.ssh/id_rsa.
Your public key has been saved in ~/.ssh/id_rsa.pub.
Key Deployment:
Deploy the ~/.ssh/id_rsa.pub key from Ansible control machine to Remote Node in a file ~/.ssh/authorized_keys. Match the contents of ~/.ssh/authorized_keys and id_rsa.pub. There should not be any difference.
WorkerNode:~$ cat ~/.ssh/authorized keys
Now, we are ready with SSH connection authentication. But whenever we try to connect from the Ansible control machine to Remote Node, it will ask for the private key password which we have provided while generating keys using ssh-keygen. To avoid this problem we will use other two tools.
ssh-agent: It is an authentication agent which handles all the private keys and passwords. ssh-agent command initiates an ssh-agent background program which we will be used later to store private key passwords. You will notice the below output on the terminal. Add the output in .bash_profile to always load it automatically.
AnsibleControlMachine:~$ ssh-agent
SSH_AUTH_SOCK=/tmp/ssh-fluQn665/agent.31665; export SSH_AUTH_SOCK;
SSH AGENTPID=2788; export SSH_AGENT_PID;
echo Agent pid 2788;
ssh-add: It is a ssh tool used to add private keys identity to the authentication agent.
AnsibleControlMachine:~$ ssh-add ~/.ssh/id_rsa
AnsibleControlMachine:~$ ssh-add ~/.ssh/id_rsa
Enter passphrase for ~/.ssh/id_rsa:
Identity added: ~/.ssh/id_rsa
Once private keys are added to the ssh-agent, We will be able to ssh to RemoteNode from AnsibleControlMachine without passing the password or any other key information.
AnsibleControlMachine:~$ssh user@workerNode
workerNode:~echo “Welcome to workerNode”
Test Sample ansible command:
ansible -v workernode -m ping -u user
Ansible Playbooks
Playbooks are the files where the Ansible code is written. Playbooks are written in YAML format. YAML means “Yet Another Markup Language,” so there is not much syntax needed. Playbooks are one of the core features of Ansible and tell Ansible what to execute, and it is used in complex scenarios. They offer increased flexibility.
Playbooks contain the steps which the user wants to execute on a particular machine. And playbooks are run sequentially. Playbooks are the building blocks for all the use cases of Ansible.
Ansible playbooks tend to be more configuration language than a programming language.
Through a playbook, you can designate specific roles to some of the hosts and other roles to other hosts. By doing this, you can orchestrate multiple servers in very different scenarios, all in one playbook.
Playbook Structure
Each playbook is a collection of one or more plays. Playbooks are structured by using Plays. There can be more than one play inside a playbook.
The function of the play is to map a set of instructions which is defined against a particular host.
Ansible playbooks help IT staff program applications, services, server nodes, or other devices without the manual overhead of creating everything from scratch. And Ansible playbooks — as well as the conditions, variables, and tasks within them — can be saved, shared, or reused indefinitely
Ansible Workflow
Ansible works by connecting to your nodes and pushing out a small program called Ansible modules to them. Then Ansible executed these modules and removed them after finished. The library of modules can reside on any machine, and there are no daemons, servers, or databases required.
Management Node is the controlling node that controls the entire execution of the playbook. The inventory file provides the list of hosts where the Ansible modules need to be run. The Management Node makes an SSH connection and executes the small modules on the host’s machine and install the software.
Ansible removes the modules once those are installed so expertly. It connects to the host machine executes the instructions, and if it is successfully installed, then remove that code in which one was copied on the host machine.
Sample Playbook
---
- name: Install Java package (Ubuntu/Debian)
apt:
name: "{{ java_apt_package }}"
state: present
update_cache: yes
when: ansible_os_family == 'Debian'
- name: Install Java package (CentOS/RHEL)
yum:
name: "{{ java_yum_package }}"
state: present
update_cache: yes
when: ansible_os_family == 'RedHat'
Ansible Role Structure
Let’s have a look at the standard role directory structure. For each role, we define a directory with the same name. Inside, files are grouped into subdirectories according to their function. A role must include at least one of these standard directories and can omit any that isn’t actively used.
To assist us with quickly creating a well-defined role directory structure skeleton, we can leverage the command ansible-galaxy init <your_role_name>.
The Ansible-Galaxy command comes bundled with Ansible, so there is no need to install extra packages.
Ansible checks for main.yml files, possible variations, and relevant content in each subdirectory. It’s possible to include additional YAML files in some directories. For instance, you can group your tasks in separate YAML files according to some characteristics.
defaults – Includes default values for variables of the role. Here we define some sane default variables, but they have the lowest priority and are usually overridden by other methods to customize the role.
files – Contains static and custom files that the role uses to perform various tasks.
handlers – A set of handlers that are triggered by tasks of the role.
meta – Includes metadata information for the role, its dependencies, the author, license, available platform, etc.
tasks – A list of tasks to be executed by the role. This part could be considered similar to the task section of a playbook.
templates – Contains Jinja2 template files used by tasks of the role.
tests – Includes configuration files related to role testing.
vars – Contains variables defined for the role. These have quite a high precedence in Ansible.